
For a dessert that looks like it belongs in a patisserie case, this retro gem has shockingly humble origins. Crinkle Cake – the mysterious dessert with the mesmerizing cracked top that looks like a frosted landscape – isn’t just making a comeback; it’s experiencing a full-blown revival thanks to millennials and Gen Z discovering their grandmother’s secret weapon.
This isn’t your modern “made from a box” creation. This is the scratch-made masterpiece that graced every church potluck, family reunion, and holiday table from the 1970s through the 1990s. And now, it’s back – more beautiful and delicious than ever.
(Strategic Ad Placement – Recommended here: Leaderboard or Anchor Ad)
Why Crinkle Cake Became (and Remains) Legendary
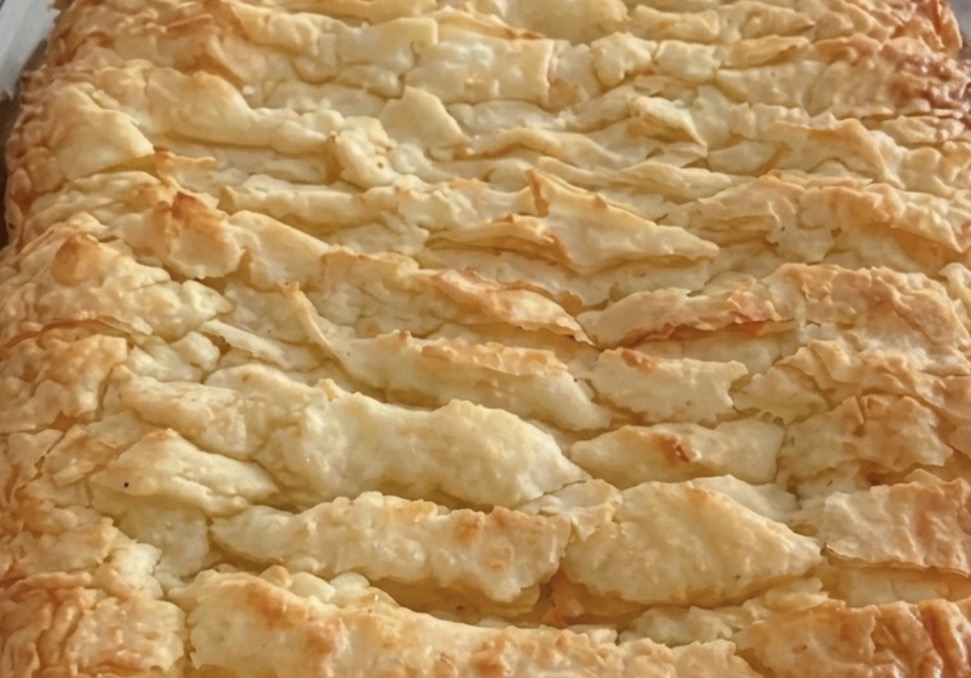
The magic of Crinkle Cake lies in its dramatic transformation. What emerges from the oven looks like a professional baker spent hours creating intentional cracks and valleys, but the secret is brilliantly simple: The frosting bakes right into the cake.
While most cakes are frosted after baking, Crinkle Cake turns this convention upside down. A creamy, sweet frosting is swirled over the batter before it goes into the oven. As the cake rises, the frosting sinks and cracks, creating those mesmerizing patterns while infusing every bite with flavor.
Three reasons this vintage dessert deserves its viral moment:
-
VISUAL DRAMA: It looks incredibly impressive with zero decorating skill
-
TEXTURE PERFECTION: Moist cake meets creamy frosting pockets
-
FOOLPROOF BAKING: The cracks hide any imperfections
The Secret to Those Perfect Cracks: A Masterclass in Retro Baking
Part 1: The Buttery Sour Cream Cake Base
-
All-Purpose Flour (2¼ cups): The reliable foundation
-
Baking Powder & Baking Soda: For the perfect rise
-
Salt: To balance the sweetness
-
Unsalted Butter (¾ cup, softened): For rich flavor
-
Granulated Sugar (1½ cups): For sweetness and tenderness
-
Eggs (3 large): Room temperature for best results
-
Full-Fat Sour Cream (1 cup): The secret weapon for ultra-moist texture
-
Vanilla Extract (2 tsp): Pure, never imitation
Part 2: The “Baked-In” Cream Cheese Frosting
-
Cream Cheese (8 oz): Full-fat, softened to room temperature
-
Powdered Sugar (1 cup): Sifted to prevent lumps
-
Egg (1 large): Yes, a raw egg in the frosting – this is the vintage way!
-
Vanilla Extract (1 tsp): For flavor harmony
-
Optional: Food Coloring: For a stunning visual (pink, blue, or leave natural)
(Strategic Ad Placement – Recommended here: In-Article Rectangle)
The Step-by-Step Guide to Vintage Baking Perfection
Step 1: Create the Cake Batter
-
Preheat oven to 350°F (175°C). Grease and flour a 9×13-inch baking pan.
-
In a medium bowl, whisk together flour, baking powder, baking soda, and salt. Set aside.
-
In a large bowl, cream softened butter and sugar until light and fluffy (3-4 minutes with a mixer).
-
Add eggs one at a time, beating well after each addition. Mix in vanilla.
-
Alternately add flour mixture and sour cream, beginning and ending with flour. Mix until just combined – do not overmix!
Step 2: Make the Magic Frosting
-
In a separate bowl, beat softened cream cheese until smooth.
-
Gradually add powdered sugar, then the egg and vanilla. Beat until completely smooth.
-
Optional: Divide frosting and tint with food coloring for a multi-colored crinkle effect.
Step 3: The Artistic Assembly
-
Spread cake batter evenly into prepared pan.
-
Drop spoonfuls of frosting randomly over the batter.
-
Using a knife or skewer, gently swirl the frosting into the batter just enough to marble – don’t mix it in completely! The goal is a marbled surface.
Step 4: Bake & Witness the Magic
-
Bake for 35-45 minutes, until a toothpick inserted in the center (avoiding a major frosting swirl) comes out clean.
-
Watch the transformation: As the cake bakes, the frosting will sink and create those beautiful cracks and valleys.
-
Cool completely in pan before serving.
(Strategic Ad Placement – Recommended here: Another In-Article Rectangle)
Pro Tips from Grandma’s Recipe Box
-
Room Temperature is Key: Cold ingredients won’t incorporate properly. Take everything out 1-2 hours before baking.
-
Don’t Over-Swirl: Three to four figure-eight motions with your knife is plenty. You want distinct frosting areas, not a fully blended batter.
-
The Crackle Guardian: If the top is browning too quickly, tent with aluminum foil for the last 15 minutes of baking.
-
Serve It Right: This cake is best at room temperature. The flavors meld and the texture is perfect after resting.
Modern Twists on a Vintage Classic
-
Chocolate Crinkle: Add ¾ cup cocoa powder to the cake batter and use chocolate cream cheese frosting
-
Lemon Blueberry: Add lemon zest to batter and fold in fresh blueberries, use lemon cream cheese frosting
-
Pumpkin Spice: Substitute 1 cup pumpkin puree for sour cream, add pumpkin pie spices
-
Confetti Funfetti: Add ½ cup rainbow sprinkles to cake batter
FAQ: Answering Your Crinkle Cake Questions
-
Q: Is it safe to eat the frosting with raw egg?
-
A: The egg bakes along with the cake, so it’s fully cooked. If concerned, use pasteurized eggs or omit the egg (the frosting will be softer).
-
-
Q: Why did my frosting disappear into the cake?
-
A: Your batter was likely too thin or you over-swirled. The batter should be thick, and swirling should be minimal.
-
-
Q: Can I make this gluten-free?
-
A: Yes! Use a 1:1 gluten-free flour blend with xanthan gum already included.
-
-
Q: How do I store leftovers?
-
A: Cover and store at room temperature for 2 days, or refrigerate for up to 5 days. Bring to room temperature before serving.
-
-
Q: Can I use a different pan size?
-
A: For a thicker cake with more dramatic cracks, use a 9-inch square pan and increase baking time to 45-55 minutes.
-
The Timeless Appeal: Why This Cake Never Really Left
Crinkle Cake represents more than just dessert – it’s edible nostalgia. In an age of perfectly piped Instagram cakes, there’s something profoundly satisfying about a dessert that celebrates beautiful imperfection. Each crack tells a story, each crinkle creates a pocket of creamy surprise.
This cake proves that sometimes the oldest recipes are the most magical. With its stunning appearance, foolproof method, and unforgettable taste, it’s no wonder this vintage treasure is capturing hearts (and social media feeds) all over again.
Ready to create your own edible masterpiece? The only thing better than the stunning appearance is the moment you take that first bite and discover why this cake became legendary in the first place